


User Tag List
 Thanks:
  Likes:
Results 1 to 5 of 5
Thread: Old school rub rail install
-
10-11-2025, 06:56 AM #1
 5000 RPM
- Join Date
- May 2019
- Location
- Georgia
- Posts
- 335
- Thanks (Given)
- 104
- Thanks (Received)
- 61
- Likes (Given)
- 472
- Likes (Received)
- 316
- Mentioned
- 3 Post(s)
- Tagged
- 0 Thread(s)
Old school rub rail install
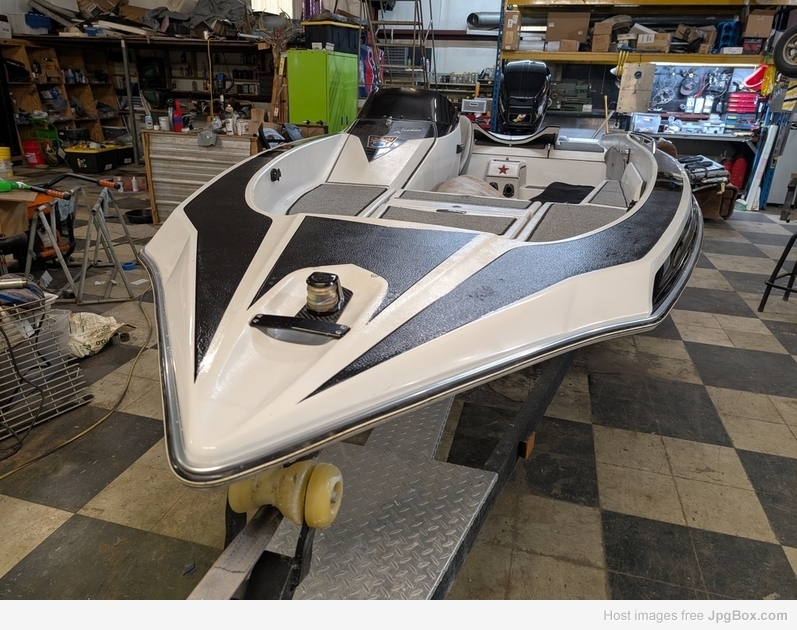
When I hit a submerged log in the river a couple years ago at about 65 mph my Allison 21 hooked violently left on me and the boat collided with some big exposed tree roots on the bank of the river, wedging the nose of the bow between them. It bent the 1 inch wide aluminum rub rail inwards, badly breaking the 'glass on one side of the bow. The old rub rail was too damaged to be restored, so I made the 800 mile round trip to Allison in Louisville, TN to buy a new 16 foot section of matching rub rail and half pint of Platinum gel coat. The 16' rub rail was inserted through the little center sliding rear window on my crew cab F250 Super Duty, the front end wrapped in a cloth and pushed up against the inside of the windshield, extending out the back and tied tightly against the top edge of the tailgate. It extended about two ft. past the back end of the truck, but was very secure for driving.
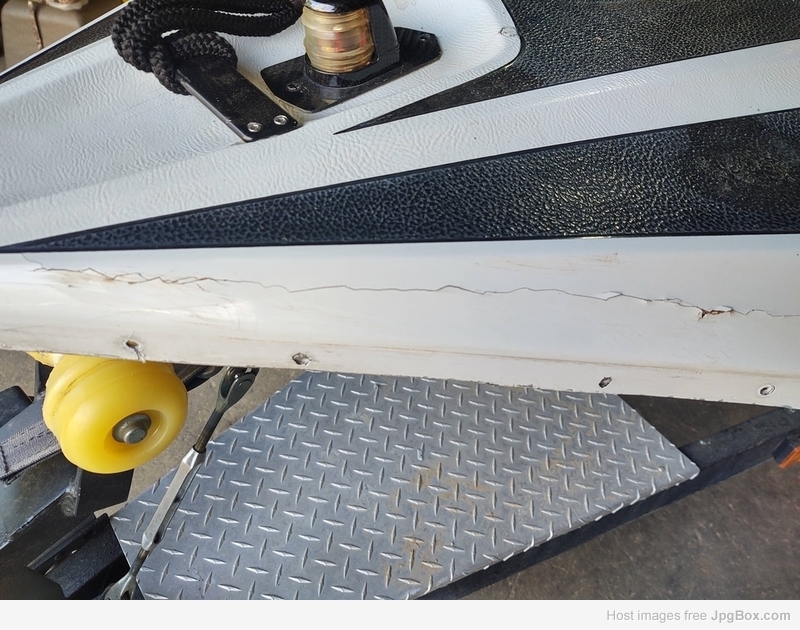
Pic of the damage after removing damaged 15' piece of rub rail.
After having the 'glass work done and the gel coat applied and buffed I was faced with reinstalling a 15 ft. section of rub rail, bending it to match the curves and angles exactly. I was convinced I could do it myself and set about trying to find instructional videos. As far as i could tell, none existed. My boat's rubrail has the black "rubber/plastic" flexible insert that snaps into the channel created by the top and bottom of the aluminum. The scary part , I knew, was going to be bending the tight curve around the nose of the Allison.
What happens when you bend it is that the top and bottom "channels", where the insert snaps into, will collapse, which won't allow the insert to be replaced. I was given many suggestions on how to prevent this from happening but none of them were satisfactory to me. I knew I had to get the bend right the first time. I wasn't about to drive another 800 miles for another one.
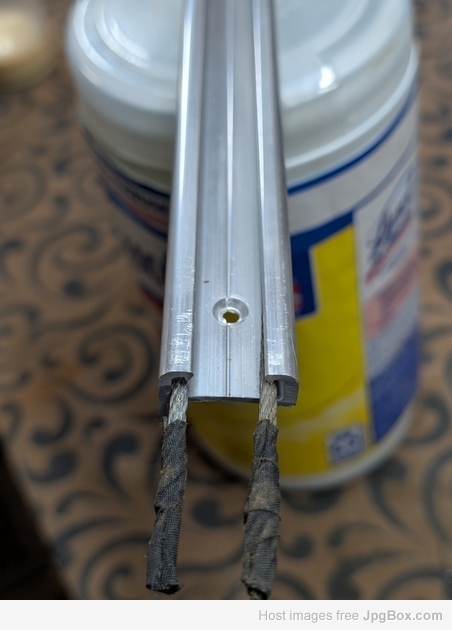
A boat enthusiast buddy of mine and I came up with a plan. We decided to cut some short pieces of steel cable, insert them in the top and bottom channels, and then make the bend. The cable would be held in the channels with tape and would prevent the channels from collapsing and, hopefully, we would be able to pull them out with a set of vice-grip pliers after the bend was done.
Pic showing a piece of the rub rail with the steel cable in place in the channels, before bending.
I cut some straight pieces out of the old rub rail that I had removed from the boat to practice with, making the bend. I cut tiny vee shaped relief notches on the back side bottom "lip", five in total, in the three to three and a half inch section where the nose bend was the tightest. We carefully measured the new rub rail so that we could do the nose bend first, then work back on each side, riveting as we went along, until we met up with the old butt ends of the rub rail sections still in place on the boat.
After a couple of practice runs with scrap pieces I was confident I could do it, and we "shot for score". The steel cable worked PERFECTLY to keep the top and bottom channels from collapsing and the bend turned out great. It was easy to pull the pieces of cable out with pliers, after the bend was done. The entire process only took us about an hour, or less, but had required lots of pre-planning.
I wanted to post this with the hopes that someone might see it and save themselves lots of agony doing it themselves.
-
10-11-2025, 07:18 AM #2
6000 RPM
- Join Date
- Feb 2002
- Location
- Cudjoe Key FL
- Posts
- 1,677
- Thanks (Given)
- 71
- Thanks (Received)
- 649
- Likes (Given)
- 3987
- Likes (Received)
- 5898
- Mentioned
- 0 Post(s)
- Tagged
- 0 Thread(s)
That is a great DIY tip. Thank you for sharing.

-
 AlliStan thanked for this post
-
10-11-2025, 07:58 AM #3
Screaming And Flying!
- Join Date
- Mar 2008
- Location
- Tourist Trap, Florida
- Posts
- 15,130
- Thanks (Given)
- 415
- Thanks (Received)
- 1478
- Likes (Given)
- 6103
- Likes (Received)
- 11792
- Mentioned
- 2 Post(s)
- Tagged
- 1 Thread(s)
Difficult job done right.... Cable trick for bending is a good one!
83 V-King, 96 Mariner, ff block 2.5 w/a 28p chopper
Ain't it great to have papa TRUMP back at the helm?
Rebuild thread:
http://www.screamandfly.com/showthre...-it&highlight=
http://www.screamandfly.com/showthre...cs.&highlight=
Videos
-
AlliStan thanked for this post
-
10-14-2025, 12:01 AM #4
6000 RPM
- Join Date
- Nov 2006
- Posts
- 1,759
- Thanks (Given)
- 18
- Thanks (Received)
- 183
- Likes (Given)
- 86
- Likes (Received)
- 785
- Mentioned
- 45 Post(s)
- Tagged
- 0 Thread(s)
Bending Process
Did you form the final bend right on the boat or make a plywood mandrel and form it on a press? Originally Posted by AlliStan

-
10-14-2025, 06:10 AM #5
5000 RPM
- Join Date
- May 2019
- Location
- Georgia
- Posts
- 335
- Thanks (Given)
- 104
- Thanks (Received)
- 61
- Likes (Given)
- 472
- Likes (Received)
- 316
- Mentioned
- 3 Post(s)
- Tagged
- 0 Thread(s)
Thanks for the reply and question.
I formed it right on the nose of the boat itself. That is the reason I decided to begin the install at the nose, so that I could bend it back on both sides at the same time. The little relief cuts on the bottom lip, on the backside are crucial. I considered making a mandrel but the more I looked at it the more I felt like the boat itself was the perfect mandrel.
Again, the key was practicing on a few 16" long pieces before "going for broke" with the new rub rail. It didn't take a tremendous amount of strength , or effort, to make the bend. But, we did have to chock the trailer tires good to hold the boat in place while I pushed back making the convex bend. BTW, the two concave bends back aways from the nose were made with a rubber mallet. It formed the rub rail perfectly into the curves. Remember to rivet as you go. We drilled and riveted it about every 8" or so, not reusing the old rivet holes, but drilling for new ones.
Feel free to contact me if there's any more questions I can help with.Last edited by AlliStan; 10-14-2025 at 06:16 AM.

 Reply With Quote

Similar Threads
-
OMC Tech: School Me On Old School ('50's) 2 Banger JohnRudes......
By Instigator in forum Technical DiscussionReplies: 32Last Post: 01-14-2015, 07:48 AM -
OMC Rail ? 2 stroke v8 sand rail?
By 40hpmariner in forum General Boating DiscussionReplies: 12Last Post: 01-26-2011, 10:37 AM -
Old School V.S. New School Paint
By EVILWAYS in forum General Boating DiscussionReplies: 138Last Post: 07-29-2009, 02:24 PM


