

User Tag List
 Thanks: 0
 Likes:
Results 1 to 12 of 12
-
01-21-2020, 12:00 PM #1
 5000 RPM
- Join Date
- May 2001
- Location
- Indiana
- Posts
- 188
- Thanks (Given)
- 0
- Thanks (Received)
- 3
- Likes (Given)
- 0
- Likes (Received)
- 13
- Mentioned
- 0 Post(s)
- Tagged
- 0 Thread(s)
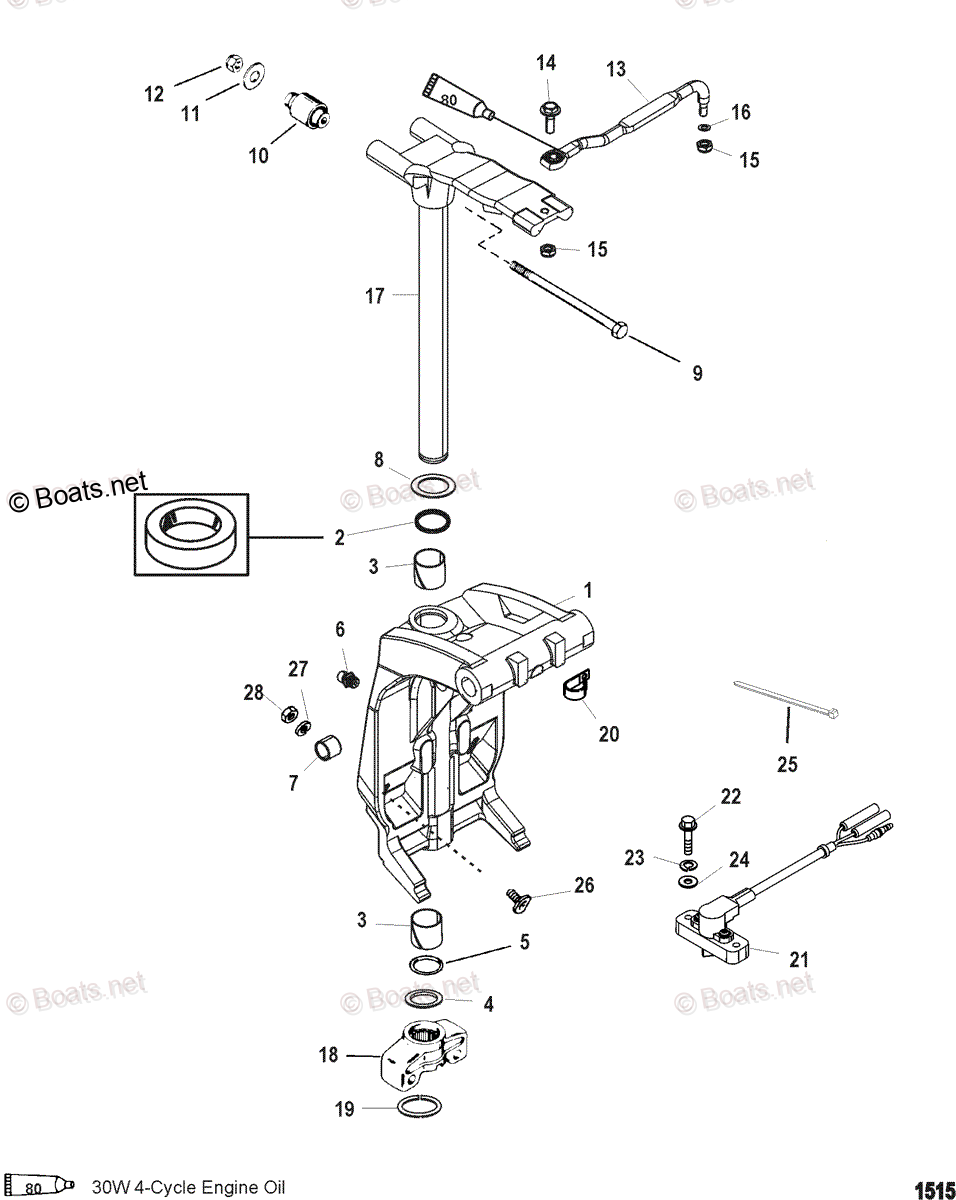
20" 2.5L - Steering Arm / Bottom Yoke Split Ring Install Suggestion
Looking for advice on how to install item 19 split ring. I finally got it on but it warped it in the process. It's too critical of a part for not to be perfect; I've got a new one ordered.
Anyone who's done this probably knows what I dealing with.
It slips over the splines on the bottom of the Steering Arm (17). Thanks

-
01-21-2020, 12:43 PM #2
5000 RPM
- Join Date
- Oct 2016
- Location
- Amityville, NY
- Posts
- 176
- Thanks (Given)
- 27
- Thanks (Received)
- 13
- Likes (Given)
- 73
- Likes (Received)
- 127
- Mentioned
- 0 Post(s)
- Tagged
- 0 Thread(s)
I just took mine apart and will be re assembling soon. It's my first go around dealing with this but I'll put the split ring back one layer at a time and roll it up the swivel pin to the groove in small increments. I'll use a small 90* pick to separate the split ring and work both sections of the ring separately if that makes any sense. Think of the ring as a small Slinky, each ring is two rings combined, separate them with the 90* pick and work them towards the groove in small increments. I hope this helps but I bet your really confused now.
I'm sure someone with better knowledge will be along soon.
-
01-21-2020, 02:59 PM #3
5000 RPM
- Join Date
- May 2001
- Location
- Indiana
- Posts
- 188
- Thanks (Given)
- 0
- Thanks (Received)
- 3
- Likes (Given)
- 0
- Likes (Received)
- 13
- Mentioned
- 0 Post(s)
- Tagged
- 0 Thread(s)
The pic idea makes sense but this ring is very stiff to open up.
I'm doing this with the parts (swivel, transom brackets) attached to the transom; the mid is still off. Now that I'm thinking about this and If i would have known, I would have done this on a workbench where one can muscle this ring a lot easier. It may come to that. Won't take much labor to remove the Swivel from the transom brackets. That's probably what I'll do when the new one shows up.
Another plan is to find a large socket with a slightly larger OD than the splines on the steering arm. On a workbench, I'm sure I can slide the ring onto this socket. Then slide the opened ring onto the steering tube (maybe).Last edited by David L; 01-21-2020 at 03:04 PM.
-
01-21-2020, 03:10 PM #4
Screaming And Flying!
- Join Date
- Apr 2001
- Location
- Michigan
- Posts
- 15,422
- Thanks (Given)
- 214
- Thanks (Received)
- 475
- Likes (Given)
- 7697
- Likes (Received)
- 4259
- Mentioned
- 1 Post(s)
- Tagged
- 1 Thread(s)
The ring will stretch out and not fit tight if you're not careful. I machined a piece of aluminum bar stock to fit in the tube and a taper to slide the ring up. The socket trick works too if a buddy is around to press down to the tube.
-
01-21-2020, 10:16 PM #5
6000 RPM
- Join Date
- Jun 2009
- Location
- Bristol, Connecticut
- Posts
- 1,106
- Thanks (Given)
- 141
- Thanks (Received)
- 44
- Likes (Given)
- 129
- Likes (Received)
- 252
- Mentioned
- 1 Post(s)
- Tagged
- 0 Thread(s)
What does this part do?

-
01-22-2020, 08:24 AM #6
Supporting Vendor
- Join Date
- Jun 2006
- Location
- Silverton section of Toms River, NJ/Stuart, Florida
- Posts
- 10,205
- Thanks (Given)
- 374
- Thanks (Received)
- 314
- Likes (Given)
- 821
- Likes (Received)
- 1999
- Mentioned
- 1 Post(s)
- Tagged
- 1 Thread(s)
Get rid of it and the slop Originally Posted by Aaronhl

-
 Capt.Insane-o liked this post
-
01-22-2020, 09:39 AM #7
Supporting Member
- Join Date
- Feb 2004
- Location
- Palm City Fla
- Posts
- 7,211
- Thanks (Given)
- 0
- Thanks (Received)
- 834
- Likes (Given)
- 0
- Likes (Received)
- 6513
- Mentioned
- 13 Post(s)
- Tagged
- 1 Thread(s)
Slop Stop .. the only way to go ..

I machine the cup to go over the snap ring. Not that it's needed anymore, but it will tighten a loose one on the way down ..
Stock ring thing, I made an installer out of a piece of tubing. One tap, it's on.
Before that, I cut a little less that a 1/4" off of one side, and used a pair of transmission shop style, flat bill expander pliers ..
-
-
01-22-2020, 02:37 PM #8
5000 RPM
- Join Date
- Mar 2004
- Location
- vonore tn.
- Posts
- 225
- Thanks (Given)
- 0
- Thanks (Received)
- 21
- Likes (Given)
- 4
- Likes (Received)
- 28
- Mentioned
- 1 Post(s)
- Tagged
- 0 Thread(s)
Excellent idea. GOOD JOB.
-
03-16-2020, 08:56 PM #9
6000 RPM
- Join Date
- Jun 2009
- Location
- Bristol, Connecticut
- Posts
- 1,106
- Thanks (Given)
- 141
- Thanks (Received)
- 44
- Likes (Given)
- 129
- Likes (Received)
- 252
- Mentioned
- 1 Post(s)
- Tagged
- 0 Thread(s)
I am working on a rusty one right now
Do the brand new or freshwater used swivels have a little slop?
Because I noticed on my rusty one it has more movement than I would like (without the split ring in)
Not sure how much more it has than another used one.
What alternatives are there to stop the slop besides only using the oem split ring?
-
03-17-2020, 05:35 AM #10
Screaming And Flying!
- Join Date
- Sep 2017
- Location
- Ashland city tn
- Posts
- 4,774
- Thanks (Given)
- 226
- Thanks (Received)
- 353
- Likes (Given)
- 1177
- Likes (Received)
- 1115
- Mentioned
- 4 Post(s)
- Tagged
- 1 Thread(s)
Only 2 ways to stop slop , rebuild with all new and take a risk the tube is wallered out ,or send swivel to Chaz, which I plan on doin for this next build
If ones has been bouncing round alot it will oval shape the tube
-
03-18-2020, 09:08 AM #11
6000 RPM
- Join Date
- Jun 2009
- Location
- Bristol, Connecticut
- Posts
- 1,106
- Thanks (Given)
- 141
- Thanks (Received)
- 44
- Likes (Given)
- 129
- Likes (Received)
- 252
- Mentioned
- 1 Post(s)
- Tagged
- 0 Thread(s)
I am having trouble removing the steering arm #17 in the picture above. Any ideas on how to remove it? I have the bracket apart so its just the assembly pictured above. I tried hammering the steering arm out from the bottom splines and think I got it jammed
-
03-23-2020, 01:45 PM #12
6000 RPM
- Join Date
- Jun 2009
- Location
- Bristol, Connecticut
- Posts
- 1,106
- Thanks (Given)
- 141
- Thanks (Received)
- 44
- Likes (Given)
- 129
- Likes (Received)
- 252
- Mentioned
- 1 Post(s)
- Tagged
- 0 Thread(s)
Good idea to weld the yoke onto the steering arm??

 Reply With Quote


Similar Threads
-
looking 4...15 " steering/ tiller arm from factory mid and can to yoke studs
By graynester in forum Parts WantedReplies: 1Last Post: 08-05-2018, 08:28 AM -
3.0 L steering arm bottom yoke
By bobthebuilder in forum Parts WantedReplies: 4Last Post: 03-02-2018, 08:17 AM -
mercury bottom steering yoke ground wire orientation
By redemn93 in forum Technical DiscussionReplies: 25Last Post: 10-29-2013, 11:03 AM


