


User Tag List
 Thanks:
  Likes:
Results 376 to 390 of 581
Thread: 1978 Viking rebuild
-
09-05-2020, 02:43 PM #376
 Platinum Team Member
- Join Date
- Jul 2006
- Location
- Minneapolis MN
- Posts
- 940
- Thanks (Given)
- 168
- Thanks (Received)
- 147
- Likes (Given)
- 2652
- Likes (Received)
- 981
- Mentioned
- 1 Post(s)
- Tagged
- 0 Thread(s)
Sorry, Lake, Im at the lake today. I can get measurements tomorrow morning. Originally Posted by LakeFever
 '78 Hydrostream Viking/'98 225 ProMax
Restoration: https://www.screamandfly.com/showthr...Viking-rebuild
Pictures: https://www.flickr.com/photos/152974...57708863869223
Videos: https://www.youtube.com/tnels
-
09-05-2020, 05:56 PM #377
 Scream And Fly VIP
- Join Date
- Jun 2018
- Location
- Floating around
- Posts
- 3,984
- Thanks (Given)
- 474
- Thanks (Received)
- 423
- Likes (Given)
- 3393
- Likes (Received)
- 2479
- Mentioned
- 1 Post(s)
- Tagged
- 0 Thread(s)
It was a hopeful long shot. I guessed and went 32” outside to outside and it’s a bit wide. No rush now but I will still be thankful to know. Enjoy the lake I’m on dryland all weekend. Boo lol
Hydrostream dreamin
-
09-23-2020, 02:20 PM #378
Platinum Team Member
- Join Date
- Jul 2006
- Location
- Minneapolis MN
- Posts
- 940
- Thanks (Given)
- 168
- Thanks (Received)
- 147
- Likes (Given)
- 2652
- Likes (Received)
- 981
- Mentioned
- 1 Post(s)
- Tagged
- 0 Thread(s)
Plugging away at rigging, slowly but surly. Seems like every time I turn around I'm ordering some type of hardware I forgot about. I'm sure the UPS man is getting sick of dragging box after box from McMaster-Carr to my house. I should say that I've conceded any chance at putting it in the water before it freezes this year. Splash date will have to be in the spring.
It's almost painful to be cutting so many holes in this thing. But I've been diligent about coating any exposed wood with gel coat and adding 4200 to any screws that are threading into wood.
Blue LED strip lights were installed about as high as they could be in the deck. They glow well on the interior and make for a neat look. The self adhesive backing lasted a whole day and fell off. If the surface was cleaned better prior to install they might've held. I ended up using a dab of 4200 every few inches and that seems to hold.
The bow lights are also LED strip style and mounted to the underside of the rub rail gives a really clean look. They are super bright and easy to see even mounted the way they are.
Helm and steering hoses are installed for good. For some reason I ordered 18' hoses, thats why they come so far forward before turning back to the helm. Having the T nuts installed in the wood supports for the deck worked really well for mounting the hose clamps.
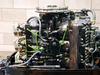
Gauges are installed and wiring had begun on those. Since the newer style gauges use a harness instead of studs for wiring there's a few extra wires behind the dash. I added three buss bars to gang all the gauges together, I think this is cleaner than splicing all the wires into one. I have to send the switch panel out to be anodized and milled before installing the switches and really getting the wiring done.
Since the wiring is a bit of a stand still I started working on finishing the work on the trailer. Adding a swing tongue and transom strap hooks. I need the room from the swing tongue before I can get the engine bolted to the jack plate.Last edited by tnelsmn; 09-26-2020 at 08:59 AM.
'78 Hydrostream Viking/'98 225 ProMax
Restoration: https://www.screamandfly.com/showthr...Viking-rebuild
Pictures: https://www.flickr.com/photos/152974...57708863869223
Videos: https://www.youtube.com/tnels
-
 sonicss33, LakeFever, Hippie459MN, rjdubiel, Gw1nels175, Hydrodreams, Merc 2.5, Code Red, mrichartz, W2F a V-King and 1 others liked this post
-
09-23-2020, 04:32 PM #379
Screaming And Flying!
- Join Date
- Mar 2008
- Location
- Tourist Trap, Florida
- Posts
- 14,753
- Thanks (Given)
- 381
- Thanks (Received)
- 1305
- Likes (Given)
- 5602
- Likes (Received)
- 11033
- Mentioned
- 2 Post(s)
- Tagged
- 1 Thread(s)
Be a nice ride when your done.
83 V-King, 96 Mariner, 200 hp ff block 2.5 w/a 28p choppa

We gotta clean this liberal mess up, VOTE TRUMP TO MAGA!
Rebuild thread:
http://www.screamandfly.com/showthre...-it&highlight=
http://www.screamandfly.com/showthre...cs.&highlight=
Videos
-
 tnelsmn thanked for this post
-
10-03-2020, 05:15 PM #380
Screaming And Flying!
- Join Date
- Sep 2017
- Location
- Ashland city tn
- Posts
- 4,774
- Thanks (Given)
- 226
- Thanks (Received)
- 353
- Likes (Given)
- 1177
- Likes (Received)
- 1115
- Mentioned
- 4 Post(s)
- Tagged
- 1 Thread(s)
I like the lights up under the cap. Much better look and easier on the eyes at night gonna b one nice rig
-
tnelsmn thanked for this post
-
10-03-2020, 06:17 PM #381
7000 RPM
- Join Date
- Jul 2005
- Location
- AZ
- Posts
- 2,752
- Thanks (Given)
- 327
- Thanks (Received)
- 218
- Likes (Given)
- 4905
- Likes (Received)
- 2386
- Mentioned
- 1 Post(s)
- Tagged
- 0 Thread(s)
You are going to straighten up that wiring before you finish right?..lol
Looking good?LETS GO BRANDON.... LETS GO BRANDON
Sometimes I talk to myself...then we both just laugh and laugh

'84 Checkmate Convincor
-
tnelsmn thanked for this post
-
10-14-2020, 09:05 PM #382
Platinum Team Member
- Join Date
- Jul 2006
- Location
- Minneapolis MN
- Posts
- 940
- Thanks (Given)
- 168
- Thanks (Received)
- 147
- Likes (Given)
- 2652
- Likes (Received)
- 981
- Mentioned
- 1 Post(s)
- Tagged
- 0 Thread(s)
Thanks guys!
Waiting on my switch panel to get back from being anodized and machined before I can complete the wiring. I told the shop no rush to hopefully save a few bucks.
The trailer work is finished and the new winch and jack are on. Fulton makes some really nice pieces. I added some laser cut stainless steel emblems to the trailer for a little extra finishing touch.
I started in on the cone job on the lower. This is the original 2:1 preload case, we'll see how long it lasts.
I 100% TIG welded the cone to the case. I fabbed a water passage from 1/8" sheet metal, I just never really liked the look of the hose. A trim tab was also cut from sheet metal and welded to the skeg. I followed the article posted on Wave to Wave and filled the farthest starboard water inlet and also slightly blunted the point of the nose.
The filler and paint work are left to be done, I plan to paint the lower and mid with Imron once finished.Last edited by tnelsmn; 10-17-2020 at 12:45 PM.
'78 Hydrostream Viking/'98 225 ProMax
Restoration: https://www.screamandfly.com/showthr...Viking-rebuild
Pictures: https://www.flickr.com/photos/152974...57708863869223
Videos: https://www.youtube.com/tnels
-
-
10-15-2020, 10:52 AM #383
6000 RPM
- Join Date
- Oct 2008
- Location
- Nowthen, Minnesota
- Posts
- 1,646
- Thanks (Given)
- 26
- Thanks (Received)
- 33
- Likes (Given)
- 698
- Likes (Received)
- 365
- Mentioned
- 0 Post(s)
- Tagged
- 0 Thread(s)
Rumor has it you might do my next cone job... HaHa Looks awesome bud!
-Kevin
Project Vulture | Project Vector | Project Vamp | Project CobraJet
1977 Hydrostream Vulture - Worlds longest ongoing project.
1982 Hydrostream Vector
1982 Hydrostream Vamp
1973 Hydrostream Vixen
1976 CobraJet Jet Boat - Outboard conversion project
199? Glastron - aka Boat Anchor
1976 Pontoon - aka The Family Truckster
-
10-17-2020, 03:12 PM #384
5000 RPM
- Join Date
- Aug 2003
- Location
- lakeville MA
- Posts
- 133
- Thanks (Given)
- 4
- Thanks (Received)
- 1
- Likes (Given)
- 26
- Likes (Received)
- 2
- Mentioned
- 0 Post(s)
- Tagged
- 0 Thread(s)
Tony what happened to your Instagram?
craig Harrison81 Hydrostream Vector
21' pontoon boat
14' GW Invader (sold)
17' action 2.4 merc (sold)
-
10-23-2020, 06:47 PM #385
Platinum Team Member
- Join Date
- Jul 2006
- Location
- Minneapolis MN
- Posts
- 940
- Thanks (Given)
- 168
- Thanks (Received)
- 147
- Likes (Given)
- 2652
- Likes (Received)
- 981
- Mentioned
- 1 Post(s)
- Tagged
- 0 Thread(s)
First layer of epoxy putty is on the lower unit. I'm surprised at how thin this stuff is. I don't see how you could use the epoxy alone to hold the cone on as the instructions from Bob's would suggest. Anyway I can already see there's a few low spots and will need at least another coat after sanding the high spots of this down.
I set the cone aside since more of my wiring supplies arrived. I want to continue with the wire until it's nearly finished, then get back to the engine.
I added a 6 place fuse block behind the dash to power up the majority of the accessories, this also has a 6 place negative buss bar built in. I added the main 12 place buss bars under the splash well near the battery.
3 of the 4 speakers are mounted. The last one will have to wait as control cables and the engine harness will need to route behind it and it will be in the way.
I ordered all my wiring supplies from Pro Wire USA. It's their "Tefzel" wire, which is tinned wire and some impressive insulation thats also nice and thin.
Yes I'm crazy and all the wires are labeled where they terminate, and every screw that goes into wood has a liberal amount of 4200 on it. The wires look a bit sloppy now but will be tidied up once they're all in and I can snug up the zip ties.'78 Hydrostream Viking/'98 225 ProMax
Restoration: https://www.screamandfly.com/showthr...Viking-rebuild
Pictures: https://www.flickr.com/photos/152974...57708863869223
Videos: https://www.youtube.com/tnels
-
-
10-23-2020, 07:20 PM #386
Screaming And Flying!
- Join Date
- Sep 2017
- Location
- Ashland city tn
- Posts
- 4,774
- Thanks (Given)
- 226
- Thanks (Received)
- 353
- Likes (Given)
- 1177
- Likes (Received)
- 1115
- Mentioned
- 4 Post(s)
- Tagged
- 1 Thread(s)
Only social media I do is scream and fly. I have no other anythings , I like it like that. But back to your rig. I was talkin to a buddy yesterday (member here) and we was talkin bout spraying gel and he said man thats gotta b hard , I then started telling him bout your build and being your 1st one and seems like you been doin it 30yrs , then I told him u said really wasn't all that hard. You have really went the extra 100 miles on this. Patience pays off i guess. Thats where I struggle, always wanna b n a hurry. Gotta make myself slow down Originally Posted by tnelsmn
-
tnelsmn thanked for this post
-
10-23-2020, 09:23 PM #387
Platinum Team Member
- Join Date
- Jul 2006
- Location
- Minneapolis MN
- Posts
- 940
- Thanks (Given)
- 168
- Thanks (Received)
- 147
- Likes (Given)
- 2652
- Likes (Received)
- 981
- Mentioned
- 1 Post(s)
- Tagged
- 0 Thread(s)
Thanks for the kind words, Merc. As far as spraying the gel. It is a lot of work, but I wouldn't call it difficult. Not to take away from guys who are good at it, but the stuff is so thick and comes out of the gun so slow its very forgiving compared to say automotive paint. I don't think gun technique is nearly as important with gel. It is very labor intensive with sanding and buffing, but agin more labor than skill. Then agin I've only sprayed my boat and could just as easily eat my words on the next project haha.
I've been blessed with a lot of patience. I find very tedious work almost relaxing.'78 Hydrostream Viking/'98 225 ProMax
Restoration: https://www.screamandfly.com/showthr...Viking-rebuild
Pictures: https://www.flickr.com/photos/152974...57708863869223
Videos: https://www.youtube.com/tnels
-
10-23-2020, 10:33 PM #388
6000 RPM
- Join Date
- Oct 2008
- Location
- Nowthen, Minnesota
- Posts
- 1,646
- Thanks (Given)
- 26
- Thanks (Received)
- 33
- Likes (Given)
- 698
- Likes (Received)
- 365
- Mentioned
- 0 Post(s)
- Tagged
- 0 Thread(s)
I was wondering where you went or what happened. I have not been on the old social media much myself as of late. If it wasnt for the groups and pages I have, I would get rid of it as well. Originally Posted by tnelsmn
-Kevin
Project Vulture | Project Vector | Project Vamp | Project CobraJet
1977 Hydrostream Vulture - Worlds longest ongoing project.
1982 Hydrostream Vector
1982 Hydrostream Vamp
1973 Hydrostream Vixen
1976 CobraJet Jet Boat - Outboard conversion project
199? Glastron - aka Boat Anchor
1976 Pontoon - aka The Family Truckster
-
tnelsmn liked this post
-
11-19-2020, 11:53 AM #389
Platinum Team Member
- Join Date
- Jul 2006
- Location
- Minneapolis MN
- Posts
- 940
- Thanks (Given)
- 168
- Thanks (Received)
- 147
- Likes (Given)
- 2652
- Likes (Received)
- 981
- Mentioned
- 1 Post(s)
- Tagged
- 0 Thread(s)
November 16th marked two years since it was pulled in the garage. I can't believe it's been that long!
Still plugging away with the wiring. I've been busy with lots of other stuff the last few weeks so progress has been kinda slow. But a few more things are done.
Bilge pump is mounted, plumbed, and wired in. I changed the wiring a bit so that instead of running the auto feature directly to the battery it will pull power from the hot side of the master switch on the dash. That way when I throw the main battery switch in the rear, everything is off. The plumbing had to get a little crazy to get out from the bilge and around the knees and fuel tank. There isn't much extra space around the tank. The black on the hose is actually heat shrink hose clamps. Saw them in Hot Rod magazine years ago.
The radio and all speakers are finished. I did buy a 12 pin Deutsch plug for the radio so it can be removed easier in the future if needed. The antenna is mounted below the bow to keep it hidden. It gets good reception inside my garage even on iffy local stations. I'm surprised at how well this set up sounds and the fact that the entire thing is completely hidden is cool. The head unit has an app to control every feature from a phone so you don't need to see it. But there's very few buttons and it's easy to control by feel.
The original horn and USB charge port are mounted and wired, everything forward of the dash is now finished.'78 Hydrostream Viking/'98 225 ProMax
Restoration: https://www.screamandfly.com/showthr...Viking-rebuild
Pictures: https://www.flickr.com/photos/152974...57708863869223
Videos: https://www.youtube.com/tnels
-
11-20-2020, 11:46 AM #390
Supporting Vendor
- Join Date
- Nov 2019
- Location
- Canada
- Posts
- 877
- Thanks (Given)
- 58
- Thanks (Received)
- 128
- Likes (Given)
- 311
- Likes (Received)
- 475
- Mentioned
- 2 Post(s)
- Tagged
- 0 Thread(s)
All I can say is WOW! I just finished reading this thread front to back, I kept waiting for the part where you might skimp out on a detail, or something, but you didn't! It seems like you have thought about every detail, from trailer to motor, to boat and everything in between. The labor hours involved are unreal too! WOW GREAT JOB!
EDIT: And documenting every detail in the process too, that in itself is difficult at the best of times, and takes a huge amount of time.
Blake
www.InjectorService.com
Call/Text - 204-326-0390
-
tnelsmn thanked for this post


 Reply With Quote


Similar Threads
-
1978 vking rebuild
By rjdubiel in forum Fiberglass and Composites DiscussionReplies: 155Last Post: 04-30-2021, 01:35 PM -
complete rebuild Monster Viking
By primerate2 in forum Appearance ModsReplies: 10Last Post: 10-25-2011, 02:14 PM -
Blue 1978 viking lansing, mich
By 200VEGAS in forum General Boating DiscussionReplies: 1Last Post: 08-07-2010, 09:04 AM -
1978 Galaxy rebuild
By Auggie2612 in forum Jet Boats, V-Drives and Stern DrivesReplies: 12Last Post: 08-25-2009, 10:32 PM


