

User Tag List
 Thanks: 0
 Likes: 0
Results 1 to 15 of 23
-
03-31-2012, 06:30 PM #1
 5000 RPM
- Join Date
- Apr 2011
- Location
- Northcentral WI
- Posts
- 169
- Thanks (Given)
- 0
- Thanks (Received)
- 0
- Likes (Given)
- 0
- Likes (Received)
- 0
- Mentioned
- 0 Post(s)
- Tagged
- 0 Thread(s)
1983 Hydrostream Vking Resto - core, transom, floor
This is my first boat rebuild, and so far it has gone pretty well. Would just like to get a thread going for when I have questions during the glassing process to get some help. I have the transom cut out, and all the core on the bottom of the boat removed up to about where the seat box would go. For the first part of my recore I am just going to go about to the dash. After I lay in new core, I will cut out the core under the front deck and do that part as well. This is to help hold the shape of the hull since no jig is under that part of the boat.
My goal for the boat is to get it back into reliable and safe condition. Core will be traditional balsa, and stringers will be made of wood. Transom I would like to go composite, not sure on best material for this yet? Floor will be a plastic honeycomb/glass skin as well to save weight.
Here are a few pictures to tell the story of where I am now.
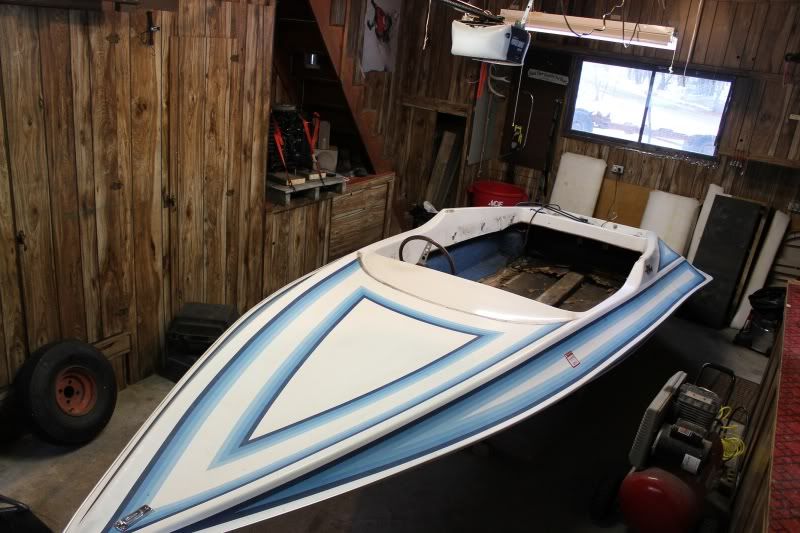
The boat as it sat when I got it.

Interior out, in the garage ready to be put on jig
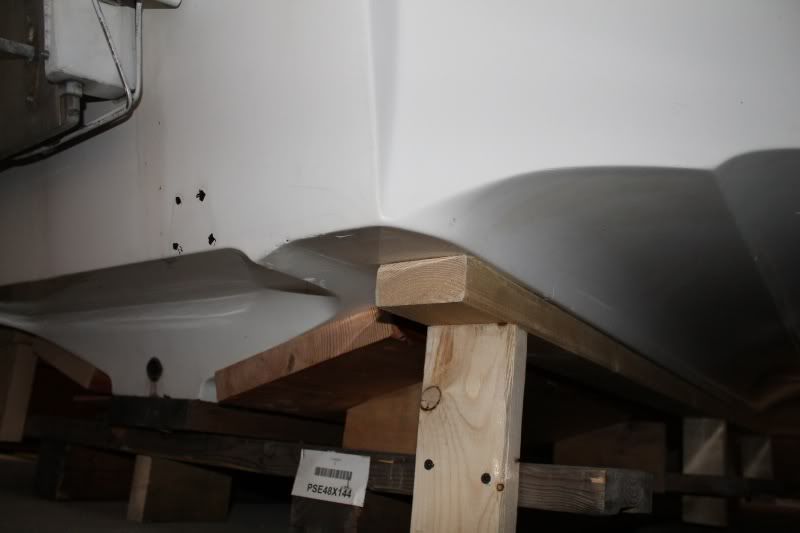
jig built and boat on jig. Later I put some spray foam under the pad as the boat sat on the jig to make sure there were no air gaps. Did this before removing core. I hope it will help hold it straighter, as I won't have time to blueprint it this year.
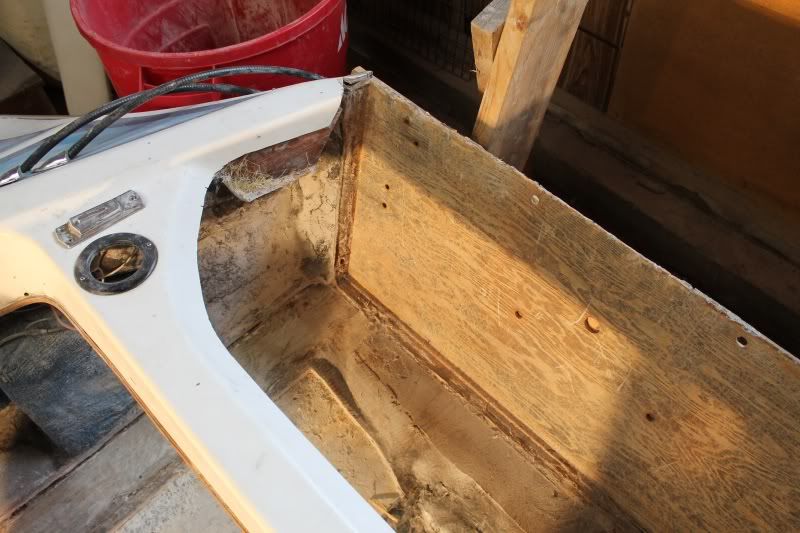
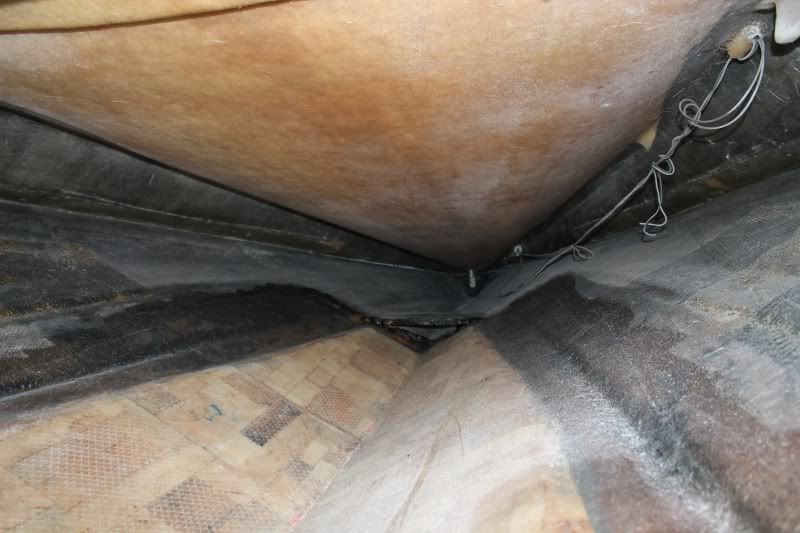
transom was pretty bad
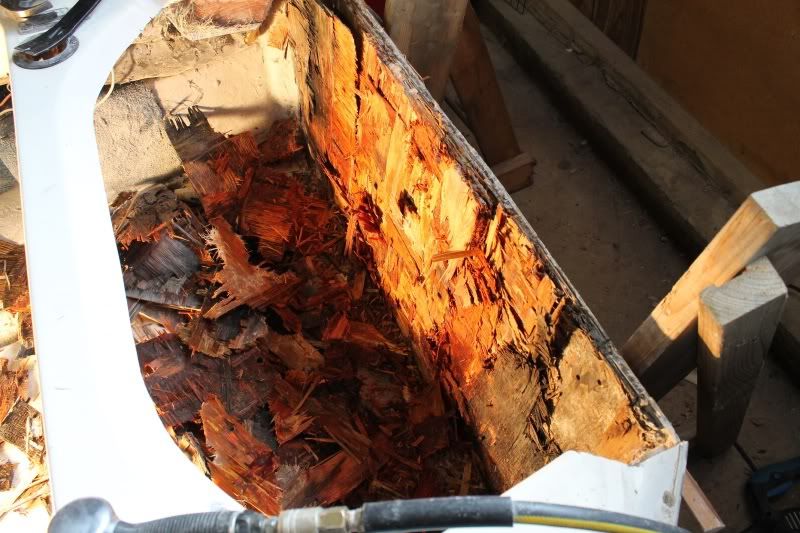
pad wet and rotten, kind of scary

transom out
-
03-31-2012, 06:32 PM #2
5000 RPM
- Join Date
- Apr 2011
- Location
- Northcentral WI
- Posts
- 169
- Thanks (Given)
- 0
- Thanks (Received)
- 0
- Likes (Given)
- 0
- Likes (Received)
- 0
- Mentioned
- 0 Post(s)
- Tagged
- 0 Thread(s)
My first question. As you can see I am going to go with a flat deck and not a splash well. Anyone have a thread or advice on how to do this. I am not sure how I am going to keep the glass flat and not have it sag?
Also, what do most people recommend for composite transom?
-
03-31-2012, 06:54 PM #3
Team Member
- Join Date
- Nov 2006
- Location
- Montgomery MN - Abu Dhabi UAE
- Posts
- 1,641
- Thanks (Given)
- 1
- Thanks (Received)
- 3
- Likes (Given)
- 6
- Likes (Received)
- 14
- Mentioned
- 0 Post(s)
- Tagged
- 0 Thread(s)
Looks good so far.
I used 26lb density material from Space Age for my transom. I am also using polypropylene honeycomb for my deck. I am amazed at how strong it is once you get some glass on it, I would go with at least 3/8" if not 1/2" for a floor. For the splashwell on my viper I made up a 1/4" thick glass panel and cut it to fit then glassed it in.Chet Olson
-
03-31-2012, 08:11 PM #4
6000 RPM
- Join Date
- May 2009
- Location
- WEST MICH
- Posts
- 1,663
- Thanks (Given)
- 0
- Thanks (Received)
- 0
- Likes (Given)
- 0
- Likes (Received)
- 2
- Mentioned
- 0 Post(s)
- Tagged
- 0 Thread(s)
Hey guy i would go with a pre- made panel to fill in the area of concern using two layers of fabric which will stop the glass from saging that also can be used for more beef when glassed over considering i once did all .............................the custom motor wells on all 32-A's for Triple O-B's when at Skater....... Which in your case should be a walk in the park .
Last edited by OFFSHORE GINGER; 03-31-2012 at 08:16 PM.
-
04-01-2012, 05:41 AM #5
Screaming And Flying!
- Join Date
- Mar 2008
- Location
- Tourist Trap, Florida
- Posts
- 14,753
- Thanks (Given)
- 381
- Thanks (Received)
- 1305
- Likes (Given)
- 5602
- Likes (Received)
- 11033
- Mentioned
- 2 Post(s)
- Tagged
- 1 Thread(s)
My rebuild may be of some help, check out the links on my post and you can see how mine was done. Has proven to be very strong, and gives lot's of room for oil tank and batt in back with a 28 gal fuel tank rite against the transom.
83 V-King, 96 Mariner, 200 hp ff block 2.5 w/a 28p choppa

We gotta clean this liberal mess up, VOTE TRUMP TO MAGA!
Rebuild thread:
http://www.screamandfly.com/showthre...-it&highlight=
http://www.screamandfly.com/showthre...cs.&highlight=
Videos
-
04-01-2012, 11:45 AM #6
5000 RPM
- Join Date
- Apr 2011
- Location
- Northcentral WI
- Posts
- 169
- Thanks (Given)
- 0
- Thanks (Received)
- 0
- Likes (Given)
- 0
- Likes (Received)
- 0
- Mentioned
- 0 Post(s)
- Tagged
- 0 Thread(s)
I have looked over your thread and knew you had a flat deck in the back, but never have seen any notes about how you did the process. Originally Posted by XstreamVking

I have also began reading up and will I have trouble using a composite transom even though I am using traditional wood for my core and stringers. I plan to run the stringers all the way up to the transom with knee braces. I just want to make sure the composite transom will bond to the glass and resin used for all the wood. If it seems there may be trouble I can stick with marine ply for the transom.
-
04-01-2012, 02:53 PM #7
6000 RPM
- Join Date
- May 2009
- Location
- WEST MICH
- Posts
- 1,663
- Thanks (Given)
- 0
- Thanks (Received)
- 0
- Likes (Given)
- 0
- Likes (Received)
- 2
- Mentioned
- 0 Post(s)
- Tagged
- 0 Thread(s)
WI-P ,i see no problem using a different material for the transom considering everything is a composite ,and are you thinking of using Coosa, Penski , or ............. for the Transom , and to tell you the truth i would stick with a Marine grade ply just because it is cheaper, and readily avaliable at any lumber yard if you know what i mean but that is your call . Originally Posted by WIPolaris
Last edited by OFFSHORE GINGER; 04-02-2012 at 06:44 AM.
-
04-01-2012, 05:25 PM #8
Screaming And Flying!
- Join Date
- Mar 2008
- Location
- Tourist Trap, Florida
- Posts
- 14,753
- Thanks (Given)
- 381
- Thanks (Received)
- 1305
- Likes (Given)
- 5602
- Likes (Received)
- 11033
- Mentioned
- 2 Post(s)
- Tagged
- 1 Thread(s)
If you have some questions about any of the build, feel free to pm me, or ask here. I used some melamine (formica) board to make a flat mold, then divinnycell core and bi ply glass to make a pc to fit off of it, and glassed it in under under the perimeter and on top of the seam incorporating it into the top of the transoms glass. Very solid even with a 3.0 motor and no cracks.....Anywhere....
83 V-King, 96 Mariner, 200 hp ff block 2.5 w/a 28p choppa
We gotta clean this liberal mess up, VOTE TRUMP TO MAGA!
Rebuild thread:
http://www.screamandfly.com/showthre...-it&highlight=
http://www.screamandfly.com/showthre...cs.&highlight=
Videos
-
05-04-2012, 10:02 AM #9
5000 RPM
- Join Date
- Apr 2011
- Location
- Northcentral WI
- Posts
- 169
- Thanks (Given)
- 0
- Thanks (Received)
- 0
- Likes (Given)
- 0
- Likes (Received)
- 0
- Mentioned
- 0 Post(s)
- Tagged
- 0 Thread(s)
Hey guys, I have started putting new glass in.
Last Sunday I laid down a layer of 1.5 oz. chopped strand mat on the bottom skin of the hull below where my core will go. Just to make sure I didn't grind anything too thin down there. I did a layer down in the pad, then up towards the sides of the boat stopping where the floor would rest since that will get a layer after the core goes in.
Anyways, since I was working with a big area and it was my first time laying large amount of glass we mixed the resin/hardener per instructions so gel time was 20 minutes. When we laid the glass outside temp was probably slightly below 60 degrees. It took awhile to set up and the next morning it was still pretty tacky everywhere. I put the heater on in the garage to let interior temp rise up to above 70. Anyways, I was in there last night working on my transom/stringers and if I am kneeling on the hull and I go to get up my jeans will stick slightly to the glass. This was four days after that glass was laid down.
I guess should I be worried about this or is it normal? I still need to sand it down a little bit before I lay my core down to make sure I get good bond. I am worried it may not sand down well if its still not quite cured. I laminated my transom to the back of the boat last night, so my next step is going to be getting the stringers attached to the bottom of the hull and transom. Then I will move onto laying core and glassing the transom in. I would like to lay stringers down tomorrow, will I be safe to do so on this new layer of glass.
-
05-22-2012, 11:18 PM #10
5000 RPM
- Join Date
- Apr 2011
- Location
- Northcentral WI
- Posts
- 169
- Thanks (Given)
- 0
- Thanks (Received)
- 0
- Likes (Given)
- 0
- Likes (Received)
- 0
- Mentioned
- 0 Post(s)
- Tagged
- 0 Thread(s)
So I will put a little update in. I have figured out my previous issues in my last post, and am well underway.
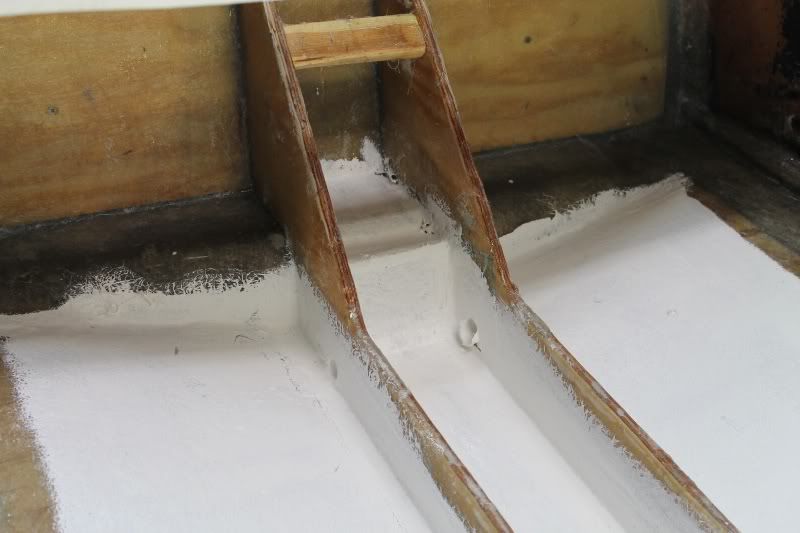
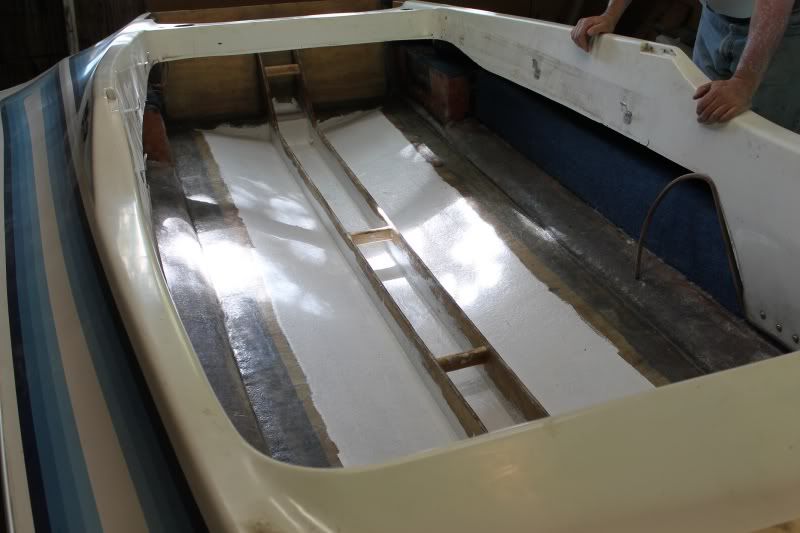
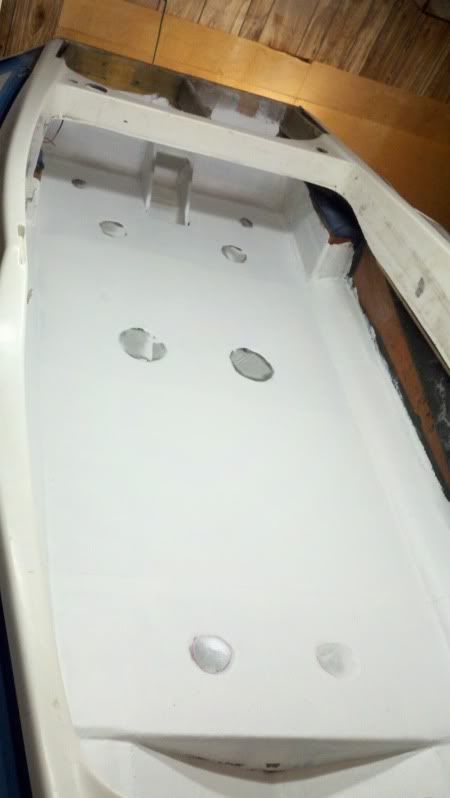
Here are my stringers, core pad, and transom in place, still not glassed over. I laid stringers down on hull, core between.
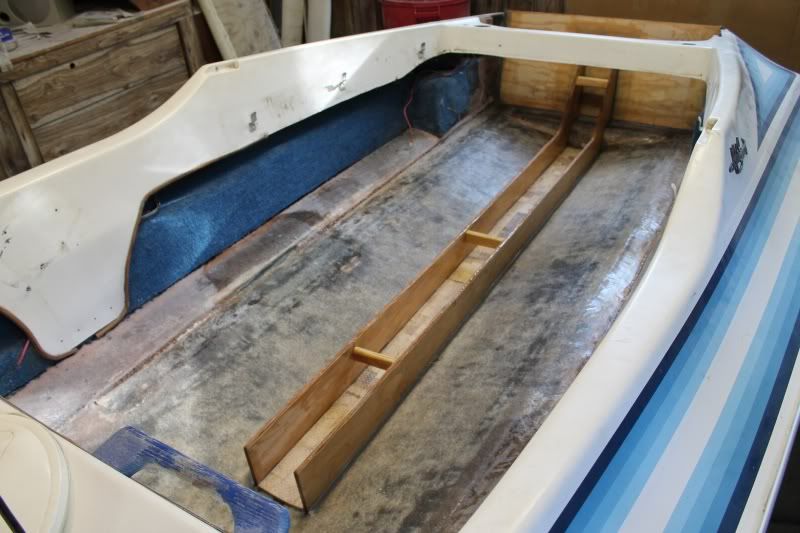
Core laid down under the bow. There is actually about 10" of old core left in front of the new. It was dry, but to make sure no contamination I sealed off between the two with resin and putty.
Now I had an experience where after I laid new glass down somehow I got a small puddle in the boat over fresh glass. Well after drying the puddle the glass was cloudy, but with a heater near the area it cleared right out. I talked to Joe at Mertons and he said not to worry about it, but it would not hurt to seal it and he suggested gel coat since I am using it various other places. I rolled it on, and it covered well. Figured it should help keep the glass dry and keep moisture to a minimum. Also you can see the drain holes drilled through stringers to allow water to drain.
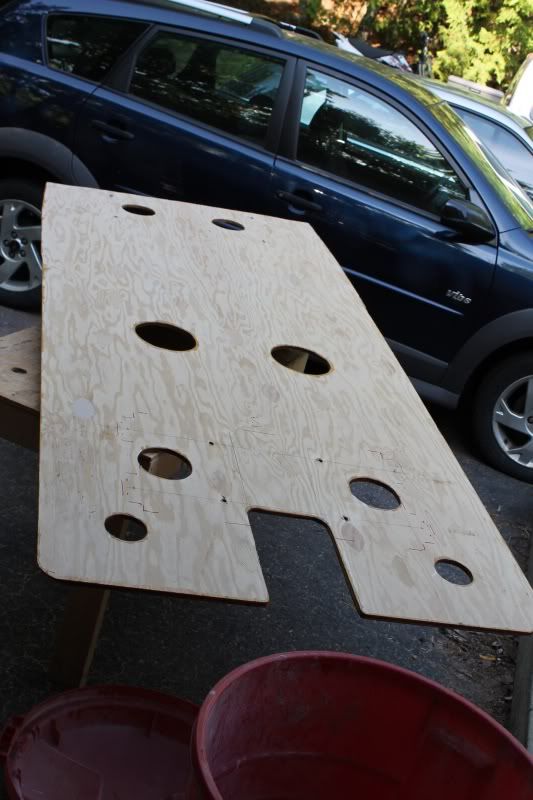
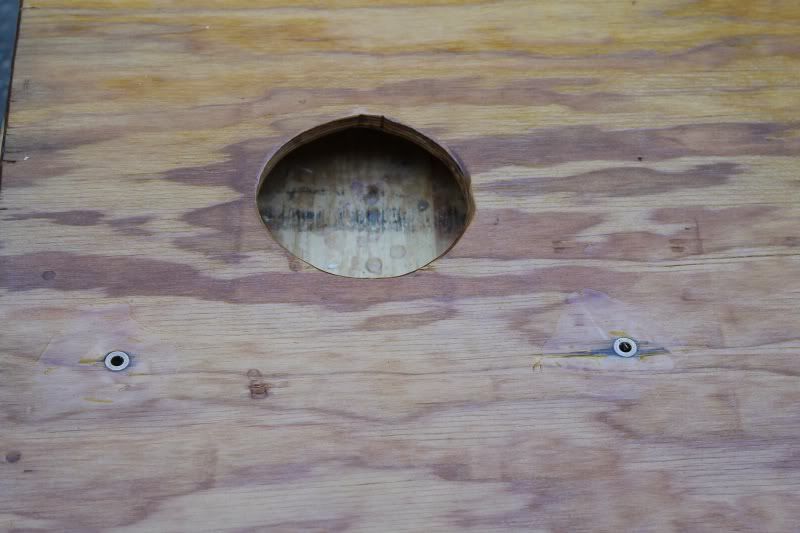
For my floor I used 1/2" ply. Vent holes/access holes in floor to get at nuts underneath floor. This will be more clear when I have pics showing how I am mounting all my seats, gas tank, battery, etc. It also should help to keep under the floor very dry, which can never be a bad thing. Since I will be bolting through the floor, it should keep it sealed never having to drill in and epoxy screws. For the bolt holes I drilled a larger diameter hole, took a bronze bushing, covered hole and bushing in epoxy and hammered in. Should keep it from getting moisture into these spots.
I need to order more supplies before glassing floor over. But, things are moving along quickly. Should be rigging early next week and first rides next week as well.
-
05-31-2012, 12:23 AM #11
5000 RPM
- Join Date
- Apr 2011
- Location
- Northcentral WI
- Posts
- 169
- Thanks (Given)
- 0
- Thanks (Received)
- 0
- Likes (Given)
- 0
- Likes (Received)
- 0
- Mentioned
- 0 Post(s)
- Tagged
- 0 Thread(s)
Back on trailer. Floor in. All really need to finish up glassing wise is the deck in back.
I would really like to be on the water in less than 10 days. Going to be some long nights ahead. Really need to be productive this weekend, but with family/friends in the area might be tough to get away.
-
06-01-2012, 05:00 AM #12
5000 RPM
- Join Date
- Feb 2010
- Location
- wisconsin
- Posts
- 475
- Thanks (Given)
- 32
- Thanks (Received)
- 21
- Likes (Given)
- 117
- Likes (Received)
- 168
- Mentioned
- 0 Post(s)
- Tagged
- 0 Thread(s)
looking great!!!
looks great!! learning a lot by just reading and looking at your restoration pics!
Originally Posted by WIPolaris
-
06-05-2012, 11:02 PM #13
5000 RPM
- Join Date
- Aug 2010
- Location
- BURLINGTON WI
- Posts
- 126
- Thanks (Given)
- 0
- Thanks (Received)
- 0
- Likes (Given)
- 0
- Likes (Received)
- 0
- Mentioned
- 0 Post(s)
- Tagged
- 0 Thread(s)
way cool your doing an awsome job i know how much work it is brian did the core on my vector i helped a little did the bottom my self and repainting the top still not done but we did get my son bradys yt done ready for the power tour hope to see ya good job staying with it
-
06-06-2012, 08:39 AM #14
Scream And Fly VIP
- Join Date
- Dec 2002
- Location
- upstate N.Y.
- Posts
- 14,633
- Thanks (Given)
- 8
- Thanks (Received)
- 56
- Likes (Given)
- 40
- Likes (Received)
- 356
- Mentioned
- 0 Post(s)
- Tagged
- 0 Thread(s)
I did my seats with the nuts that grab the bolt from the underside,so I didn't need those access holes! Originally Posted by WIPolaris
why ask me ?

-
06-06-2012, 11:58 PM #15
5000 RPM
- Join Date
- Dec 2004
- Location
- Easthampton, MA
- Posts
- 297
- Thanks (Given)
- 1
- Thanks (Received)
- 4
- Likes (Given)
- 0
- Likes (Received)
- 18
- Mentioned
- 0 Post(s)
- Tagged
- 0 Thread(s)
Looks great, nice job. I also love the color....


 Reply With Quote


