

User Tag List
 Thanks: 0
 Likes: 0
Results 1 to 15 of 24
-
12-05-2010, 09:33 PM #1
 Screaming And Flying!
- Join Date
- Aug 2004
- Location
- Venice, Florida
- Posts
- 9,630
- Thanks (Given)
- 22
- Thanks (Received)
- 109
- Likes (Given)
- 402
- Likes (Received)
- 719
- Mentioned
- 0 Post(s)
- Tagged
- 2 Thread(s)
How To Thread w/Pics: Cleaning your Optimax compressor cooling water strainer.
I wanted to put together a how to thread on cleaning the raw water / cooling strainer on your Optimax motor so I took some pics over the weekend while I cleaned the one on my 2003 225 Optimax. I believe that clogging of this strainer is a contributing factor to compressor failure. A clogged or partially clogged strainer will reduce the volume of the pee stream. I know there is a temp sensor in the compressor but I have lost two compressors before I started doing this and never had an alarm. The last one got so hot it warped the compressor housing so badly I had to beat it apart with a hammer and pry bar.
I have talked to Merc Techs who had no idea this strainer even existed. Mine had never been cleaned even after a compressor was replaced under warranty.

Its easiest to do with the lower cowling halves separate which is also a good time to change spark plugs since that bottom port side plug is difficult to access.
First, remove the upper cowling and remove the two 8mm bolts holding the two halves of the lower cowling together at the back. One is easily visible right in the middle:
The other is below and must be accessed via a little rubber oval shaped plug removed from the port side of the lower cowling. Insert a 8mm socket on an extension through the now open port and loosen the bolt. I just loosen it until it is no longer threaded and leave it like that.
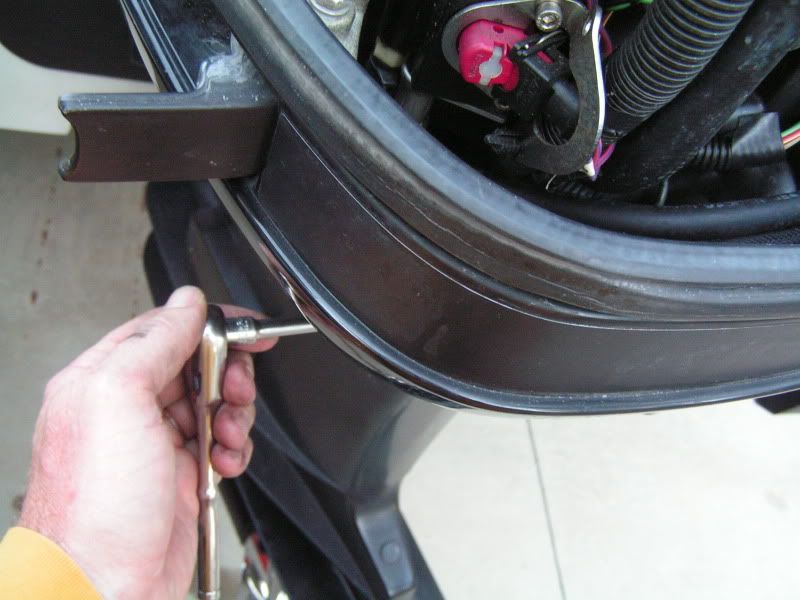
At the front, there is another 8mm bolt holding the two halves of the lower cowling together. You can losen that with an 8mm box end wrench but just enough to separate the back halves and give you a little working room.
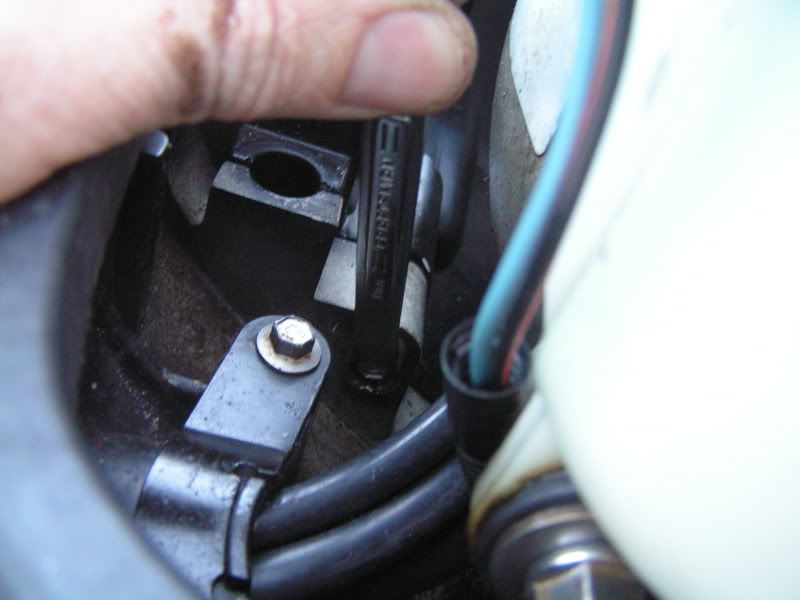
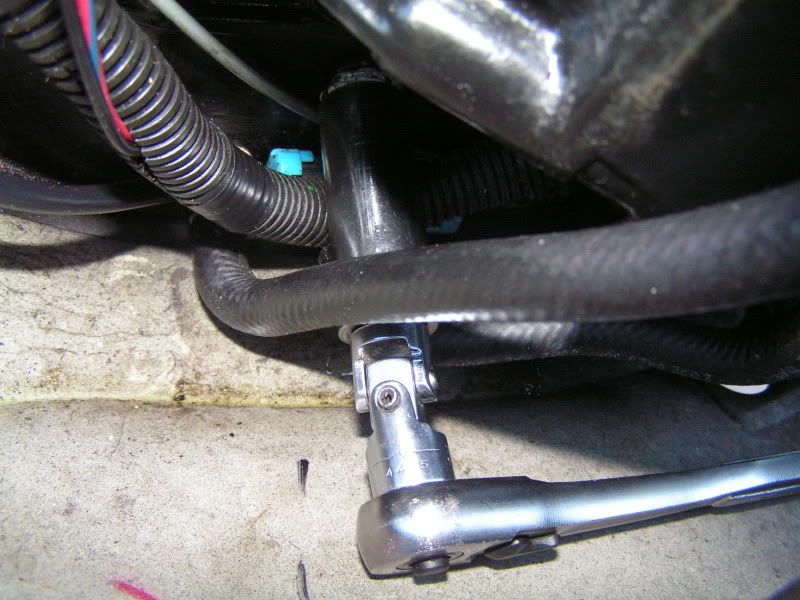
Once you have some room, look at the lower back port side of the block. You will see a hose coming off the bottom of the port side fuel rail and running to a black plastic fitting at the bottom of the block. Cut the zip tie holding the hose to the fitting and pull off the hose.

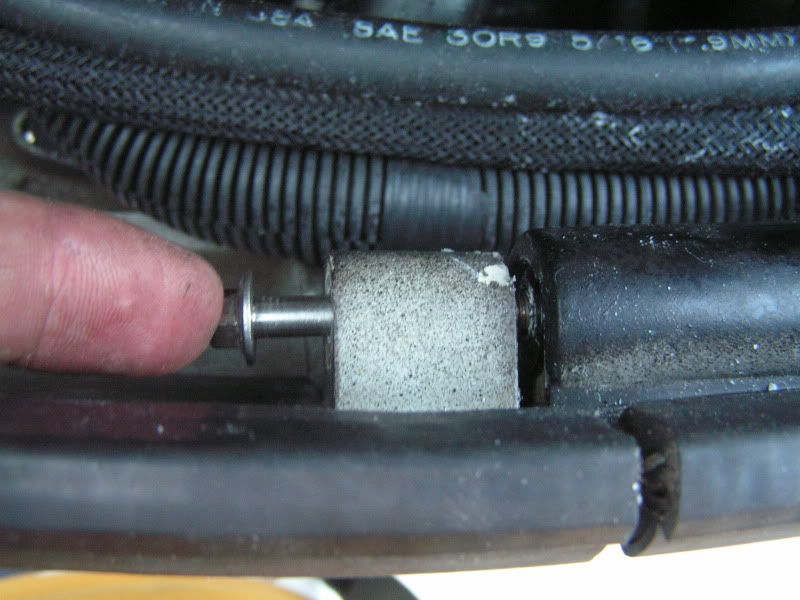
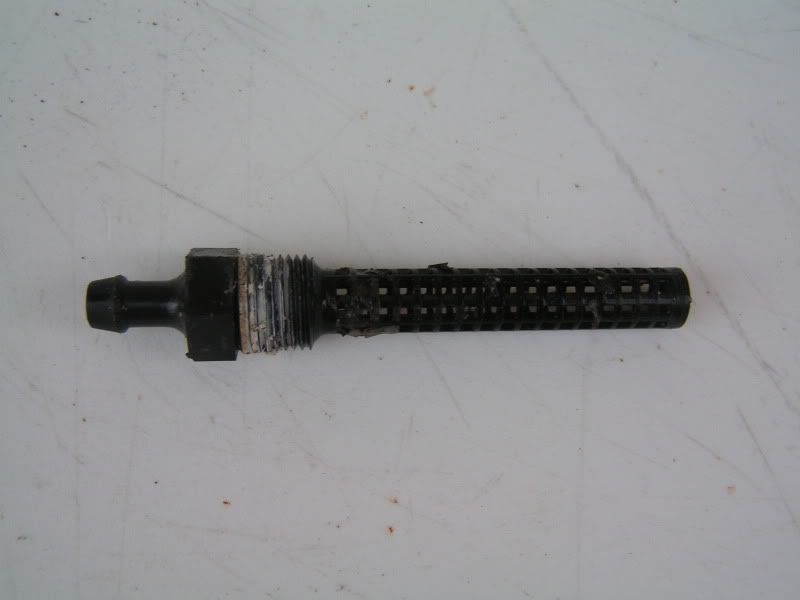
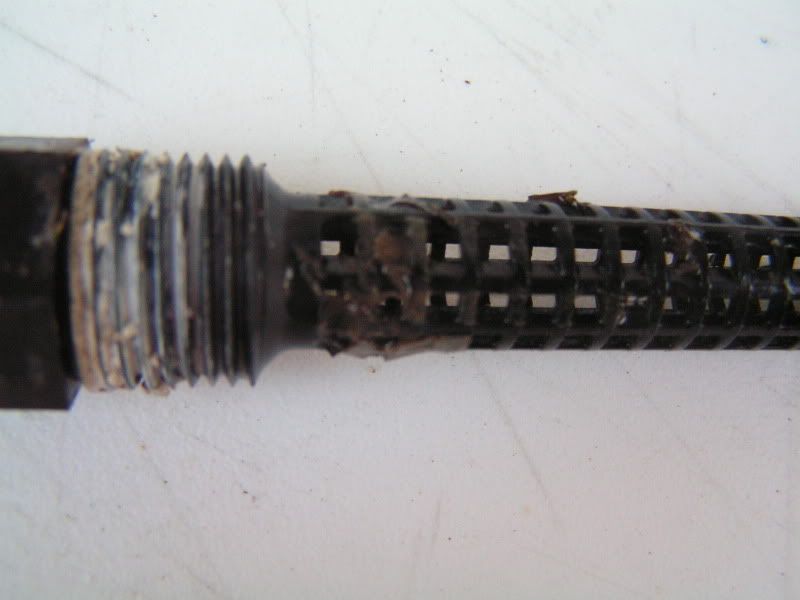
Once the hose is off, use a 16mm deep well socket to unscrew the fitting from the block. The fitting is the strainer and the whole thing will come out as one piece. It will likely have some blockage and I have been told the material found on it is likely the coating material Mercury uses to coat the water passages from corrosion protection. The first time I cleaned mine was at 200 hours and it was nearly plugged. This time, not so bad.
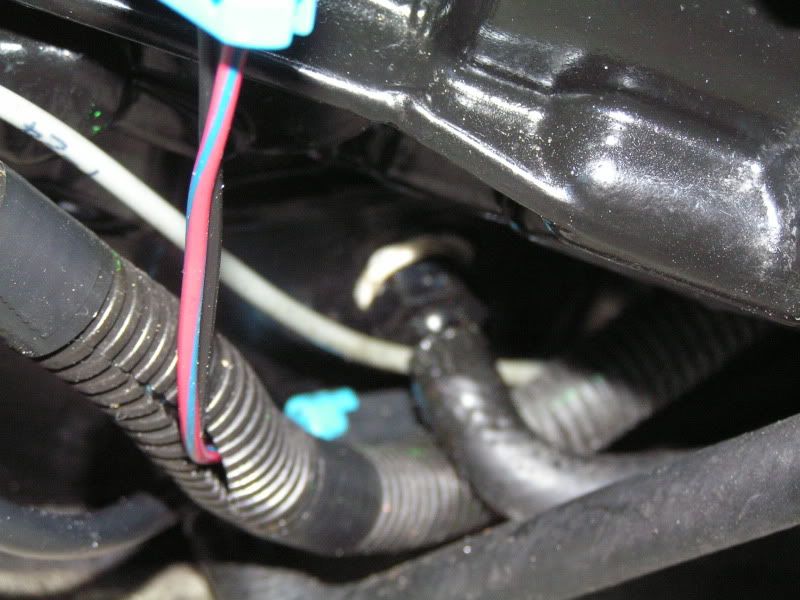
Before re-installing, remove the coolant hose from the top of the air compressor. This is the hose that routes water to the telltale ie. pee stream. I like to take a piece of hose and back flush with water to remove debris. I had a pretty good piece of junk come out this time when I back flushed.

Put some pipe thread sealant on the black plastic fitting and reinstall. Reinstall all hoses using the correct style zip ties designed for use on hoses. These are not the zip ties you can buy at the hardware store in the electrical isle. They have a curved back to the locking tab that prevents a pucker in the hose where a leak can occur. Your dealer has them. May be able to get them at an auto parts store, not sure.
Fire her up and check for leaks.13' Biel tunnel AKA "Flight Risk"
13" Modified Yamaha V4 - 101 mph
21' Paramount
Mercury 300 Promax
-
12-05-2010, 10:34 PM #2
5000 RPM
- Join Date
- May 2010
- Location
- Sarasota, Fl
- Posts
- 140
- Thanks (Given)
- 0
- Thanks (Received)
- 1
- Likes (Given)
- 15
- Likes (Received)
- 7
- Mentioned
- 0 Post(s)
- Tagged
- 0 Thread(s)
Excellent post!!!
-
12-06-2010, 10:02 AM #3
Screaming And Flying!
- Join Date
- Feb 2004
- Location
- Boca Raton, FLORIDA
- Posts
- 4,198
- Thanks (Given)
- 0
- Thanks (Received)
- 1
- Likes (Given)
- 0
- Likes (Received)
- 1
- Mentioned
- 0 Post(s)
- Tagged
- 0 Thread(s)
Looks like something that belongs in a sprinkler head.
-
12-06-2010, 05:25 PM #4
Screaming And Flying!
- Join Date
- Aug 2004
- Location
- Venice, Florida
- Posts
- 9,630
- Thanks (Given)
- 22
- Thanks (Received)
- 109
- Likes (Given)
- 402
- Likes (Received)
- 719
- Mentioned
- 0 Post(s)
- Tagged
- 2 Thread(s)
If i were a person with the means to fabricate and market a product, I think an after market screen that attached to he bottom of the fuel rail replacing this difficult to access screen would be a good product. Originally Posted by rchevelle71
 13' Biel tunnel AKA "Flight Risk"
13" Modified Yamaha V4 - 101 mph
21' Paramount
Mercury 300 Promax
-
12-06-2010, 06:03 PM #5
6000 RPM
- Join Date
- Sep 2008
- Location
- Treasure Island Fl
- Posts
- 1,160
- Thanks (Given)
- 0
- Thanks (Received)
- 5
- Likes (Given)
- 2
- Likes (Received)
- 20
- Mentioned
- 0 Post(s)
- Tagged
- 0 Thread(s)
Thank you. I will check mine soon.
Cawley
-
12-19-2010, 10:20 AM #6
Junior Member
- Join Date
- Jan 2009
- Location
- Roch NY
- Posts
- 5
- Thanks (Given)
- 0
- Thanks (Received)
- 0
- Likes (Given)
- 0
- Likes (Received)
- 0
- Mentioned
- 0 Post(s)
- Tagged
- 0 Thread(s)
I do this annually when I replace the impeller or any time I get a low telltale output. I agree an inline filter would be better. I can finagle my bottom plugs out without removing the lower cowl but still have yet to figure out easy access to the screen. Hmm...ya got me thinking now...
-
01-07-2011, 06:23 AM #7
5000 RPM
- Join Date
- Feb 2009
- Location
- South Florida
- Posts
- 124
- Thanks (Given)
- 0
- Thanks (Received)
- 0
- Likes (Given)
- 1
- Likes (Received)
- 1
- Mentioned
- 0 Post(s)
- Tagged
- 0 Thread(s)
Great thread, Local shop charged 2 hr. labor to clean mine. Next time I will do it. Thanks.
-
01-07-2011, 08:31 AM #8
5000 RPM
- Join Date
- Jun 2010
- Location
- Tampa , Fl
- Posts
- 771
- Thanks (Given)
- 1
- Thanks (Received)
- 1
- Likes (Given)
- 0
- Likes (Received)
- 2
- Mentioned
- 0 Post(s)
- Tagged
- 0 Thread(s)
Good info to share with all, thanks MR,D
Fly Safe,God Bless
Euro Muscle
-
01-09-2011, 05:56 AM #9
Screaming And Flying!
- Join Date
- Mar 2008
- Location
- Tourist Trap, Florida
- Posts
- 14,753
- Thanks (Given)
- 381
- Thanks (Received)
- 1305
- Likes (Given)
- 5602
- Likes (Received)
- 11033
- Mentioned
- 2 Post(s)
- Tagged
- 1 Thread(s)
Great info on here..Very well done... One thing I have been doing on my opti's when cleaning the strainer is to put the muffs on and start the motor and run for 15 sec with the strainer removed. This flushes the area between the pump and the water passages of any other crap left there. Have seen lots of debris come out when doing this....
83 V-King, 96 Mariner, 200 hp ff block 2.5 w/a 28p choppa

We gotta clean this liberal mess up, VOTE TRUMP TO MAGA!
Rebuild thread:
http://www.screamandfly.com/showthre...-it&highlight=
http://www.screamandfly.com/showthre...cs.&highlight=
Videos
-
01-09-2011, 10:00 AM #10
Screaming And Flying!
- Join Date
- Aug 2004
- Location
- Venice, Florida
- Posts
- 9,630
- Thanks (Given)
- 22
- Thanks (Received)
- 109
- Likes (Given)
- 402
- Likes (Received)
- 719
- Mentioned
- 0 Post(s)
- Tagged
- 2 Thread(s)
I have a flush attachment on the back of my cowling and that might do the same thing. I have also done the strainer at the same time as doing the water pump and just attached a garden hose straight to the water tube in the mid section with the lower off.
13' Biel tunnel AKA "Flight Risk"
13" Modified Yamaha V4 - 101 mph
21' Paramount
Mercury 300 Promax
-
01-10-2011, 07:44 AM #11
Screaming And Flying!
- Join Date
- Mar 2008
- Location
- Tourist Trap, Florida
- Posts
- 14,753
- Thanks (Given)
- 381
- Thanks (Received)
- 1305
- Likes (Given)
- 5602
- Likes (Received)
- 11033
- Mentioned
- 2 Post(s)
- Tagged
- 1 Thread(s)
Deameanor, The flush wont do it, needs to be running,or hose on water tube would do it. Your post was great and I just had one more thing to pass along...Presently, I am working on a relocation part for the strainer. Will post some pics when working properly.... I have two optis to maintain, so I need something to make this easier.....And do-able in the field, from the boat. Can't trust the gators and crocs to be holding my wrenches for me down in the glades when this needs cleaning....
83 V-King, 96 Mariner, 200 hp ff block 2.5 w/a 28p choppa
We gotta clean this liberal mess up, VOTE TRUMP TO MAGA!
Rebuild thread:
http://www.screamandfly.com/showthre...-it&highlight=
http://www.screamandfly.com/showthre...cs.&highlight=
Videos
-
05-26-2014, 06:10 PM #12
Junior Member
- Join Date
- Jun 2006
- Location
- Medford , NY
- Posts
- 13
- Thanks (Given)
- 0
- Thanks (Received)
- 0
- Likes (Given)
- 0
- Likes (Received)
- 0
- Mentioned
- 0 Post(s)
- Tagged
- 0 Thread(s)
I would really like to do this , but I have a 2000 year , 200 OPti , and I cannot find this strainer and fitting ....
Is it different on a 2000 and if so where would it be ?
-
05-28-2014, 09:34 PM #13
5000 RPM
- Join Date
- Nov 2006
- Location
- Richland, WA along the Columbia River
- Posts
- 586
- Thanks (Given)
- 0
- Thanks (Received)
- 13
- Likes (Given)
- 9
- Likes (Received)
- 45
- Mentioned
- 0 Post(s)
- Tagged
- 0 Thread(s)
Great thread, we need more how to discussions.
-
05-31-2014, 01:10 PM #14
Member
- Join Date
- Feb 2010
- Location
- Tarpon Springs, FL
- Posts
- 88
- Thanks (Given)
- 0
- Thanks (Received)
- 0
- Likes (Given)
- 0
- Likes (Received)
- 1
- Mentioned
- 0 Post(s)
- Tagged
- 0 Thread(s)
Cut the strainer off the fitting, end of problem. It will just flow thru like any thermo hose has always done for the last 30 years.
-
06-01-2014, 09:41 PM #15
Junior Member
- Join Date
- Jun 2006
- Location
- Medford , NY
- Posts
- 13
- Thanks (Given)
- 0
- Thanks (Received)
- 0
- Likes (Given)
- 0
- Likes (Received)
- 0
- Mentioned
- 0 Post(s)
- Tagged
- 0 Thread(s)
Well , I found mine it was where it was supposed to be ....it is below the oil tank ....and not very visible ...without splitting the cowling ...
My 2000 opti had 2 cowling bolts in the front and 2 in the rear ...
God I thought it would break , coming out ...I had to use a lot of force and then it slowly backed out ...
Also , my stainer fitting was a size 18mm socket , not a 16 mm , as maybe the newer ones ....and yes it was pretty clogged up with Brown gook ...
I used some Teflon tape to seal on the later threads as to not have the tape get near the water area ...
I like the idea of Rude Runner above ...would love to know the long term effect of cutting it off ... it makes sense not to have it at all ...


 Reply With Quote


