


User Tag List
 Thanks:
  Likes:
Results 46 to 60 of 100
-
12-12-2010, 09:09 PM #46
 Screaming And Flying!
- Join Date
- Aug 2004
- Location
- Venice, Florida
- Posts
- 9,630
- Thanks (Given)
- 22
- Thanks (Received)
- 109
- Likes (Given)
- 402
- Likes (Received)
- 719
- Mentioned
- 0 Post(s)
- Tagged
- 2 Thread(s)
Regardless of maintaining water pressur, with a V hull, the water is turbulent at the surface from coming off the boats hull. Its just not the same as running the prop through nice clean water like what comes down the center of a tunnel. Having said that, I have never tried but I am sure someone around here can comment.
If your running a transom mounted pickup, I see no reason to run the stock holes as well. Keep it simple IMO.13' Biel tunnel AKA "Flight Risk"
13" Modified Yamaha V4 - 101 mph
21' Paramount
Mercury 300 Promax
-
12-12-2010, 11:48 PM #47
5000 RPM
- Join Date
- Jun 2002
- Location
- solomons island md.
- Posts
- 978
- Thanks (Given)
- 0
- Thanks (Received)
- 0
- Likes (Given)
- 0
- Likes (Received)
- 1
- Mentioned
- 0 Post(s)
- Tagged
- 0 Thread(s)
its funny you ont hear much about transom mounted wpu in v hulls by the way mazco had an awesome nosecone
-
12-13-2010, 12:00 AM #48
5000 RPM
- Join Date
- Feb 2007
- Location
- Western Washington State
- Posts
- 692
- Thanks (Given)
- 11
- Thanks (Received)
- 6
- Likes (Given)
- 25
- Likes (Received)
- 21
- Mentioned
- 0 Post(s)
- Tagged
- 0 Thread(s)
Funny? I don't think it's funny, but I do think it is telling. Demeanor hit on something when he described getting the water intake plugged w/ sand/mud. Also, what if you hit something with the intake - a chunk of wood, for instance - and tear the thing away while underway? With the fitting in the l/u there's one more thing hanging out there that can get caught on something an break your l/u. I think these things are risky for a handful more mph. I don't know... I still might get one. Originally Posted by Ronny Jetmore

TG
-
12-13-2010, 01:34 AM #49
Screaming And Flying!
- Join Date
- Aug 2004
- Location
- Venice, Florida
- Posts
- 9,630
- Thanks (Given)
- 22
- Thanks (Received)
- 109
- Likes (Given)
- 402
- Likes (Received)
- 719
- Mentioned
- 0 Post(s)
- Tagged
- 2 Thread(s)
I dont know. I have never hit anything and damaged the bottom of my hull with either boat (knock on wood) but the front of most gearcases I see look pretty banged up after a few years. Truth is, most of us have one of these on our center console for livewell and raw water washdown and have never heard of one being damaged. This is on my Fountain. Originally Posted by croSSed
The only nosecone i can find now without pickups is the TH-marine and I dont know if it will work on my small V4 gearcase.
Last edited by Mr. Demeanor; 12-13-2010 at 01:41 AM.
13' Biel tunnel AKA "Flight Risk"
13" Modified Yamaha V4 - 101 mph
21' Paramount
Mercury 300 Promax
-
12-13-2010, 09:36 AM #50
5000 RPM
- Join Date
- Jun 2002
- Location
- solomons island md.
- Posts
- 978
- Thanks (Given)
- 0
- Thanks (Received)
- 0
- Likes (Given)
- 0
- Likes (Received)
- 1
- Mentioned
- 0 Post(s)
- Tagged
- 0 Thread(s)
location
a good source told me to mount it on the left of the pad as this is the least amount of prop disturbance
-
12-13-2010, 10:12 AM #51
6000 RPM
- Join Date
- Apr 2001
- Location
- Illinois
- Posts
- 1,562
- Thanks (Given)
- 10
- Thanks (Received)
- 77
- Likes (Given)
- 144
- Likes (Received)
- 591
- Mentioned
- 1 Post(s)
- Tagged
- 0 Thread(s)
Just epoxy the pickups shut on the nose cone rather than buy a new one. Also lose the junk hose you are using. That is not meant for the application you are using it for. It will crack and kink. I would use AN fittings and braided hose. You also have no way to drain the water from the case in the event of freezing. But in Florida that may not be a problem.
-
12-13-2010, 10:38 AM #52
Screaming And Flying!
- Join Date
- Aug 2004
- Location
- Venice, Florida
- Posts
- 9,630
- Thanks (Given)
- 22
- Thanks (Received)
- 109
- Likes (Given)
- 402
- Likes (Received)
- 719
- Mentioned
- 0 Post(s)
- Tagged
- 2 Thread(s)
This hose was just for testing as posted earlier.
The possibility of freezing is one reason I want to get rid of the Bobs nosecone. Even if I epoxy up the intakes, water will eventually find its way into that cavity at the front unless I have it completely welded around the perimiter. It was only tack welded in a few spots when it was installed by Eagle One for the previous owner. If I am going to do that I might as well use just a nosecone completely welded.
RJ, the instuctions that came with the nosecone state to mount it on the left (port) but on a V hull its still going to screw up water flow to the prop. I mounted it on the right so any drag would offset torque steer and my gearcase was already tapped on the right side for the fitting.13' Biel tunnel AKA "Flight Risk"
13" Modified Yamaha V4 - 101 mph
21' Paramount
Mercury 300 Promax
-
12-13-2010, 02:05 PM #53
5000 RPM
- Join Date
- Feb 2007
- Location
- Western Washington State
- Posts
- 692
- Thanks (Given)
- 11
- Thanks (Received)
- 6
- Likes (Given)
- 25
- Likes (Received)
- 21
- Mentioned
- 0 Post(s)
- Tagged
- 0 Thread(s)
"Left", as in port side? Originally Posted by Ronny Jetmore
-
12-13-2010, 02:26 PM #54
Screaming And Flying!
- Join Date
- Aug 2004
- Location
- Venice, Florida
- Posts
- 9,630
- Thanks (Given)
- 22
- Thanks (Received)
- 109
- Likes (Given)
- 402
- Likes (Received)
- 719
- Mentioned
- 0 Post(s)
- Tagged
- 2 Thread(s)
Yes. That way the prop is exiting the water through any turbulance caused by the pickup. Same goes for mounting a transducer. Originally Posted by croSSed
13' Biel tunnel AKA "Flight Risk"
13" Modified Yamaha V4 - 101 mph
21' Paramount
Mercury 300 Promax
-
03-02-2011, 05:53 PM #55
Screaming And Flying!
- Join Date
- Aug 2004
- Location
- Venice, Florida
- Posts
- 9,630
- Thanks (Given)
- 22
- Thanks (Received)
- 109
- Likes (Given)
- 402
- Likes (Received)
- 719
- Mentioned
- 0 Post(s)
- Tagged
- 2 Thread(s)
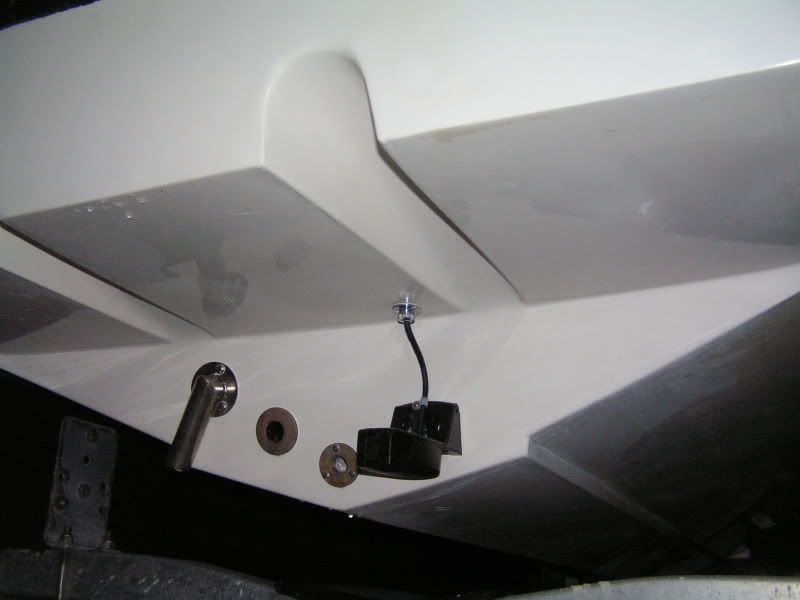
Bringing this over form the other thread in case it helps with someone doing a search:
Here is the transom mount pickup.
The part is Bobs Machine but I made some changes to it and in retrospect, would start from scrtach knowing what I do now. $50 for this part is WAY too much money. The aluminum bracket isnt anodized and already corroding. The 90 degree fitting welded to the top of the square stainless pickup tube is not stainless steel. Its just painted silver and started rusting right away (you can see the rust form the inside of the fitting in the clear hose). At some point I will be making something better but this has worked well for testing.
The pickup tube was originally set back from the transom held in place with the pinch bolt you see in the pics running through the aluminum bracket. The problem with this is that the depth of the pickup changes with running attitude. With the bow up the tube is buried. With the bow down the tube is lifted. I wanted to minimize this so I redrilled the hole for the pinch bolt so the pickup was flat against the transom. This also captures cleaner water right off the back of the sponson.
With the original 45 degree angle cut on the pickup tube, the back of the tube was down about 3/4" with the leading edge flush with the running surface. This was way too much. My first adjustment was to move it up in the bracket 1/4" and I immediately lost pressure. What happened was by raising the leading edge of the pickup above the running surface, a small triangular shaped area where air could be sucked in was created on each side of the pickup tube (Does that make sense? Difficult to describe). I put the pickup back down with the leading edge even with the running surface and began shortening the overall length of the tube on a bench grinder. I ground it down in increments eliminating the angle cut by grinding it at the same angle as the running surface. This keeps more of the sides of the pickup tube to "capture" the water then if I ground it down at an angle. The final shape is what you see in the pics. I currently have back of the pickup tube 3/16" below the running surface.
Water pressure is great and speed is unchanged from using the Bobs LWP. I think the difference in drag between the holes in the Bobs nosecone and this tiny bit if tube sticking down is a wash. I use to have 5psi and the needle was very erratic. I was probably pushing my luck. If I raised the engine at all, I lost pressure completely at about 75mph.
Now I have 20psi no matter how fast I am going (been a little over 80mph with the current setup). Its like the needle is glued to the 20psi mark. I was getting some pressure spikes at cruise speed that I think was the poppit valve opening and closing in a crazy cycle until I raised it 1/16" to its current position. Now its nice and steady. Bobs told me by plumbing it to the water pump, the pump actually acts as a pressure regulator when higher speeds create more pressure than what the pump would provide on its own. It cant create more pressure then the water pump can create.
I may raise it a little more and then if it drops off, grind a little ramp into the hull but I am going to run like this for awhile and see how it does. I usually run this boat in pretty calm water but did run 75mph in tight whitecapped chop and had nice steady pressure.
I have also included a pic of the flush adapter I made. I found a plastic fitting for my hose that was a little to big to cram up in the pickup tube. I ground the plastic into a square shape that fits snugly into the pickup tube and it works perfect. I can actually flush the engine without starting it. Just dont give it too much water pressure from the hose (watch the gauge). With the engine off the pump does not act as a pressure regulator. You could easily blow some cooling lines or the water pressure gauge line.
The downside:
The rigging is ugly. What I have now need to be cleaned up with some nicer hose and fittings but its still not going to be as clean as having it all internal. I would like to run the hose straight up through the notch in the bottom of the sponson and then have it come out on top near the jackplate to return back down to the water pump. It would be a cleaner looking install but the entire back of my boat is filled with foam from about 16" forward of the transom. I would have to put a though hull in the top of the notch and the whole thing would be more complicated. I am trying to keep things simple and light with this boat. I would like to use some braided stainless hose but that usually rusts in salt water. I found some blue heater hose that looks nice and has a good pressure rating. Any suggestion on that appreciated.13' Biel tunnel AKA "Flight Risk"
13" Modified Yamaha V4 - 101 mph
21' Paramount
Mercury 300 Promax
-
03-02-2011, 05:54 PM #56
Screaming And Flying!
- Join Date
- Aug 2004
- Location
- Venice, Florida
- Posts
- 9,630
- Thanks (Given)
- 22
- Thanks (Received)
- 109
- Likes (Given)
- 402
- Likes (Received)
- 719
- Mentioned
- 0 Post(s)
- Tagged
- 2 Thread(s)
More pics:
13' Biel tunnel AKA "Flight Risk"
13" Modified Yamaha V4 - 101 mph
21' Paramount
Mercury 300 Promax
-
01-14-2012, 02:21 AM #57
Member
- Join Date
- Jul 2011
- Location
- Louisiana
- Posts
- 36
- Thanks (Given)
- 0
- Thanks (Received)
- 0
- Likes (Given)
- 0
- Likes (Received)
- 0
- Mentioned
- 0 Post(s)
- Tagged
- 0 Thread(s)
Old thread i found through google and couldn't resist typing this. Stainless Steel can be welded to Carbon steel. You must use a 309 filler metal when doing so. I have had to Tig weld these two pieces of metal many time in the pass so YES it can be done.
-
01-31-2012, 09:35 AM #58
5000 RPM
- Join Date
- May 2009
- Location
- Valrico Florida
- Posts
- 385
- Thanks (Given)
- 0
- Thanks (Received)
- 0
- Likes (Given)
- 0
- Likes (Received)
- 6
- Mentioned
- 0 Post(s)
- Tagged
- 0 Thread(s)
The transom pick-up should be mounted left of center on a V-bottom boat so the propeller only sees the surface disturbance on the way out of the water - on a right-hand rotation prop. If you mount it on the right, it will carry the disturbance in the form of induced air down through the entire rotation and create unwanted slippage.
-
01-31-2012, 09:50 AM #59
5000 RPM
- Join Date
- May 2009
- Location
- Valrico Florida
- Posts
- 385
- Thanks (Given)
- 0
- Thanks (Received)
- 0
- Likes (Given)
- 0
- Likes (Received)
- 6
- Mentioned
- 0 Post(s)
- Tagged
- 0 Thread(s)
I had a 13' Checkmate with a Force 85 that the prop shaft was at least 1.5" above the bottom putting the entire bullet of the gear case high & dry at speed. I moved it from on center this height and went from 61 to 68 MPH. Obviously this was the bulk of my resistance on this rig. The trim responded better and it handled better. I did have to increase the size of the skeg significantly as it had a tendency to want to swap ends when turning. There just wasn't enough surface area in the water to maintain track. It looked more like a rudder than a skeg when I was done with it.</SPAN>
-
01-31-2012, 09:51 AM #60
Screaming And Flying!
- Join Date
- Aug 2004
- Location
- Venice, Florida
- Posts
- 9,630
- Thanks (Given)
- 22
- Thanks (Received)
- 109
- Likes (Given)
- 402
- Likes (Received)
- 719
- Mentioned
- 0 Post(s)
- Tagged
- 2 Thread(s)
I had great success testing with the Bobs unit. Once I had it dialed in, I fabricated my own from 3/4" square stainless tubing and stainless drain plug fitting setting at the same shape and depth as the Bobs.. The Bobs unit was 1" which was overkill.
I also added a small strainer because my boat beaches transom first and I was picking up sand even though I was careful to shut her down early.
The shape I use is flat, not angled, down 1/16" to 1/8" and just notched at the front to allow water flow in. I notch it up a little higher at the front than the running surface.
I have zero experience with trying this on a pad or V bottom though and get a lot of PM's asking me about that application. I know you would want it on the left as stated above.
Because I run it so short I have seen zero loss of performance. The faster I go, the more pressure I have.13' Biel tunnel AKA "Flight Risk"
13" Modified Yamaha V4 - 101 mph
21' Paramount
Mercury 300 Promax


 Reply With Quote


